Wednesday, December 17, 2014

11 Last Minute DIY Gifts

11 Last minute DIY gifts

Hey hey hey everyone!
Today, -seeing as I'm a horrible procrastinator myself- I thought I'd bring you guys a nice list of last minute gifts for the holidays! DIY's even. The holidays always seem to sneak in super quick to me- like I'm pretty sure Halloween was last week.
So anyway, I was scrolling through blogs and pins upon pins, and here's what I came up with:


DIY printed phone pouch
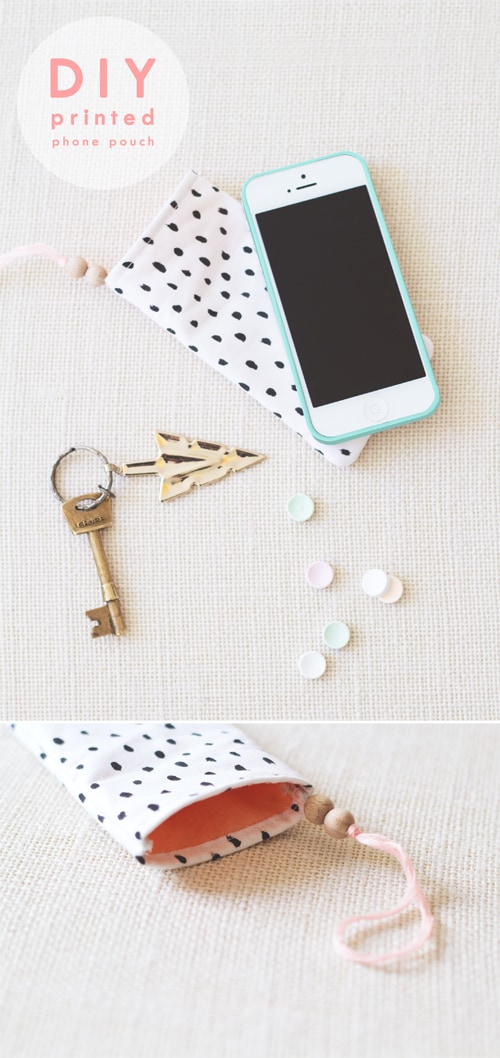
You could customize this for most anyone you know!

Kitty Magnetic Bookmark

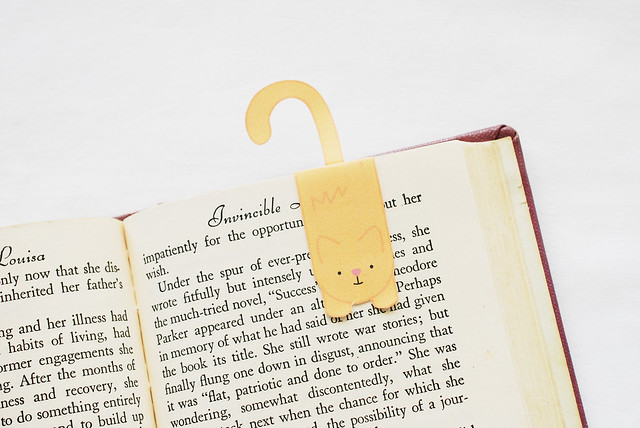
For the reader in your life. These are so simple- and it's a printable!
via Wild Olive

A Simple Clutch

I love these because you can use fabric you have lying around at home, or choose the perfect one for your receiver!
via I Heart Naptime & girl. Inspired

Simple Sharpie Journals (+ matching gift wrap!)

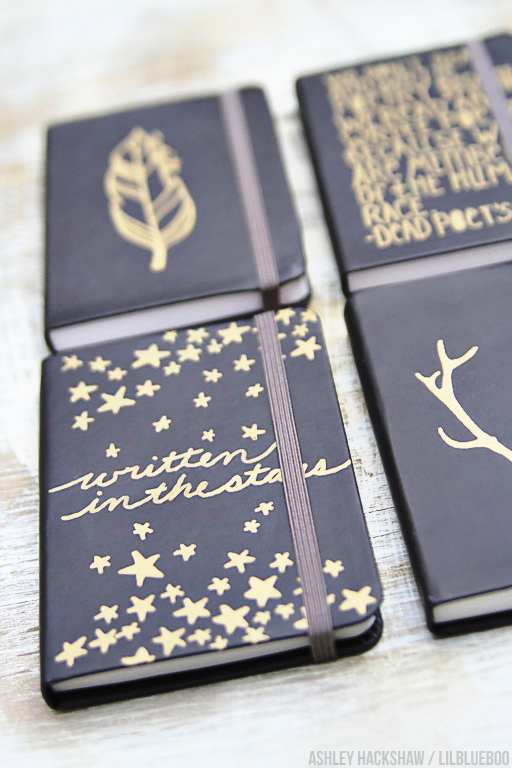
Guys. I am literally obsessed with these.
All of them. lovelovelove them.
If you have a writer or artist in your life these would be a fantastic gift!
via lil blue boo

DIY Christmas stockings


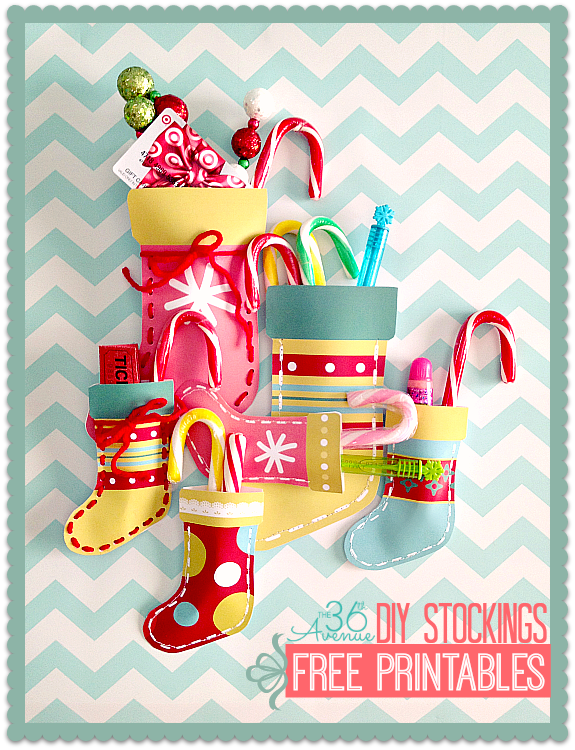
These stockings are seriously adorable, they remind me of something my grandma used to
give my sisters and me each year. You could even do them like Russian nesting dolls and put a small one inside a larger one. More stocking stuffers for everyone!
via The 36th Avenue

DIY Mini Banner

You could make these with the persons favorite quote to give a really personal and thoughtful gift!
via a little birdy blog

DIY Hot Cocoa Ornaments
These ornaments are so great. I'm definitely making these for some of my friends.
(Hopefully they're not reading this right now)
via Bubbly Nature Creations

DIY Map Necklace
This is great for the traveler(or wanna be traveler)!
via the sum of its parts

DIY Rustic Frame
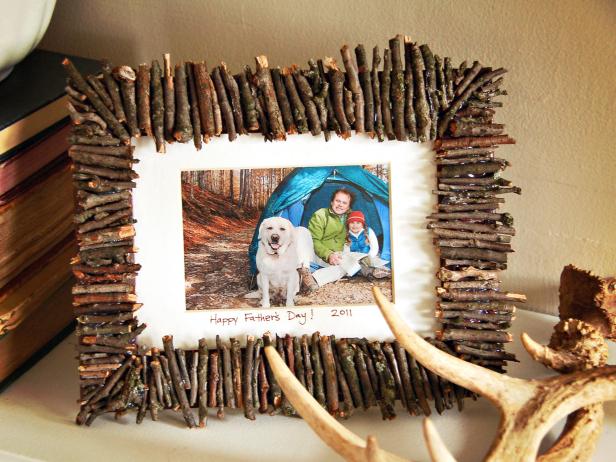
I came across this and instantly planned on making one for my parents.
I know it says fathers day, but I know either of my parents would love it!
via HGTV 

DIY Finger Knit Scarf

How about a nice scarf for the cold months?
via Just Pepperminty

DIY Chalkboard Mug

I don't know about you guys, but I'm kinda obsessed with how cute this is.
via Wit & Whistle

Alrighty, that's what I've got! Hopefully it's a little helpful to some of my fellow procrastinators.
Enjoy your holidays!

Stay Minty,
- Juli

Wednesday, November 19, 2014

DIY Fandom Totebag

DIY Fandom Totebag


Hey guys, Long time no see! (I say that way too much)
So I haven't posted this here yet, and I thought you guys might like to see it! 
Me and my sister made it for a friend quite awhile ago and I took pictures, wooooo.
Also if you haven't seen/noticed yet, I redid my design awhile ago, simpler is kinda my thing right now haha.
Anyway, on with the tutorial


What you need:
Tote bag // paint brushes // fine tip sharpie // cardboard // acrylic or fabric paint


Step one: 
Start off with a plain tote bag and wipe it clean with a dry towel or rag. I got mine from Walmart in the arts and crafts section for about $3


Step Two:

I did a sketch of the Hogwarts castle (Harry potter is liiifee) on mine and inserted a cardboard box so paint wouldn't soak through. You can freehand something, or do a quick google search to find an outline of what you want. (If you do that, just print it, cut it out with scissors or a craft knife and trace around your outline with with a pencil.)


Step three:
With a small paint brush do a quick outline of your sketch- it doesn't have to be perfect, you can touch it up later!


Step four:
With a larger brush paint in your outline. Near the bottom I added a bit of water to my paint to give it a bit of a washed/grey feel. 
You can now go around your edges to fine tune any mistakes you might've made, if you haven't made any you can move on!


Step five:
I decided to add a favorite quote of my friends- "It does not do to dwell on dreams and forget to live" 
Again, you can go online and find an outline of a banner and cut and trace it onto your bag. Once you fill it in, let the paint dry before writing on it with a pencil. Using a small brush (or fine tip sharpie) you can add your quote


Aaand that's it! 


Just let it dry, then flaunt it around! It's great for carrying books, an extra jacket, your laptop, wallet, anything that fits!
-
I've got a couple post ideas actually, so that's good news;) 

Oh and are any of you guys doing NaNoWriMo this year? Curious if there's any fellow writers around here :)

Stay Minty,
-Juli

Monday, October 27, 2014

Drugstore Halloween How to: Tiger makeup

Drugstore Halloween How to:
Tiger Makeup

Hey guys! Today I have a makeup tutorial brought to you by my little sister Kori!
She's starting her own blog soon, so I thought I'd let her get in some practice over here.


What I used:
e.l.f. Professional eye shadow brush 
Q tips
Water
Wet 'n' Wild megalast black eyeliner
e.l.f. Waterproof eye liner pen
e.l.f. liquid liner
Wet 'n' Wild rainbow eye shadow
e.l.f. black eye shadow
Thick concealer a few shades lighter than your natural skin tone
light lip gloss


 I started with an almost fresh face. Just covering up some pesky blemishes with my normal cover up.


With the wet n wild eyeliner I made some rough outlines of my tiger stripes.

Then I outlined them more precisely with the liquid liner, dipped my eye liner brush into my cup of water and made a bit of a paste with the black eye shadow, and filled in the stripes.

I made the same paste type thing with the orange Wet 'n' Wild shadow (Though the wet n wild shadow didn't need near as much water as e.l.f.), then spread it in between the stripes and across my forehead.


Ya know when you put on your eyeliner, it looks PERF and then you blink and it smudges? I did that- but on purpose to make the line thicker, then smoothed it out a bit. I used my eyeliner pen for this, but the liquid liner would work just the same.


I extended the line around my entire eye and then tried to draw a triangle, and filled it in.
 I have no advice for this. It took me a lot of Q tips and water a.k.a. I messed up about three times.


With the liquid liner again, I made a bit of a heart shape on the bottom half of my nose, and drew a line down to my lip. put a couple flecks of it to fill in the spaces and with a wet Q tip rubbed it in.


With some of the black eye shadow paste fill in your upper lip.


Cover the rest of your nose and jaw with the lighter concealer and put the lighter gloss on your bottom lip.

And you're done! Wasn't that easy?


Stay minty! Or whatever it is that Juli always says...

Stay minty,
- Juli
 (and Kori)

Friday, October 24, 2014

How To: Mask a Photo into a Shape or Text

How To: Mask a Photo into a Shape or Text
This is a super quick + easy tutorial that you can use for wall art, instagram photos, or a profile picture- maybe a shaped sidebar photo for your blog!
For this tutorial I used Photoshop, but you could use a free alternative (like gimp) if you don't have Photoshop.
So, here's how you do it:

1: Open a new file in your editing program with a transparent background. I made mine 800x800 but you can choose your size accordingly.

2: If you're using text, click on the type tool and type whatever you like. I chose a bold font that I'm sort of obsessing over at the moment!
(If you're using a shape use, one with a transparent background)

3: Drag in your photo. Place it to cover your text and hit enter. I'm using a watercolor I did of a galaxy (I'm obsessed okay!)

4: In the layers tab right click your photo's layer, and choose 'create clipping mask'. You should see that small arrow will appear on the left side.

5:Click the new layer button (the page icon at the bottom) and add a blank white layer. Drag it below your text layer. You can make the background whatever color you want, but I liked the way it flowed with my image as white.

Now you're done! 

I hope you guys liked this tutorial!

If you have any questions feel free to ask- I'll be happy to answer!


P.S. I'm working on a new blog design for my own blog AND for the blog my younger sister is starting! Hopefully you guys will be able to see them both pretty soon!


Stay Minty,
-Juli

Tuesday, October 14, 2014

Starlight


Don't you see the starlight?
Don't you dream impossible things?
{click}


-


I'll be honest, I don't really care for this photo, but Taylor is my girl and I felt like it kinda fit hehe.

Stay Minty,
-Juli

Sunday, October 12, 2014

DIY Donut Stationary

DIY Donut stationary

So, is it just me or are donut (doughnut??) graphics/watercolors/stationary/crafty things reaaaally, cute?
Well, I happen to think they are, so I put a donutty craft on my to-do list, and came up with these little guys!


I'll be honest with you, this is not how I was picturing these guys in my head! I wasn't so sure about posting them, but my family was telling me they were pretty cute, so here they are! 


• Large circular object (I used a roll of tape)
• Small circular object
• Construction paper in the colors of your choice
• Scissors or exact-o knife
• Pencil
• Tape and or glue
• Things to decorate- I used confetti that I punched, glitter pen and markers.
You can also use glitter/glitter glue and whatever else you can think of!

What you do:

• Trace around your large circle with pencil, and then use your small object to trace a middle hole
•Cut out around the large circle and then fold it in half
• Cut out the middle circle. Folding it in half just makes it easier- but feel free to do it however you please!


• Cut out another circle for either your donut shape or icing
• Cut a squiggly shape out of preferred icing color and tape or glue onto main donut shape
•Then decorate them to your hearts content.

Once you're done you can use them as stationery or you could even punch a small hole into the top and use them for bunting! Or put it into an envelope like I did and you could ship it off somewhere!
I love these cute little triangle envelopes, if you guys like them I could make a tutorial.
I haven't tried it myself yet, but I've heard you can ship them out in that shape!

I hope you guys like this simple little DIY :) If you make some, email me a picture or tag me on instagram! @Justpepperminty
I'm thinking about making some other foody shaped stationery too! I'll keep you guys updated.

Stay Minty,
Juli

Thursday, September 25, 2014

How to Finger Knit a Scarf

How to Finger Knit a Scarf


Ah, Autumn. It's coming. I know, I know, it's bittersweet for some of us. But it was bound to happen!
In honor of the chilly weather headed our ways here is a tutorial for you- How to finger knit a scarf! If you've never heard of finger knitting, it might sound a little weird, but it's also really great, and easy too! If you're familiar with loom knitting, it's pretty similar. Just use your fingers instead.
So let's get started!

What you need: 
• Scissors
• A thick skein of yarn (the thicker the better!) I used a weight of 6
• Your fingers!
1:To begin, use your index finger to tie a slipknot by wrapping the yarn around your index finger twice, then taking the bottom loop and pulling it up, then down through the top loop.Take it off your index finger and move it to your little finger, pulling it slightly tight. 

2:From there, wrap the yarn around each finger once until you get to your index finger. Once you're there, start wrapping again back the other way to make another row.

3:Starting at your little finger, begin pulling the bottom loop over the top one, and up over your finger, continue until you get to the last loop. The last one will seem kind of loose but that's okay!
Just push the loops down to the lower part of your fingers and repeat steps 2-3. 


4: The first photo is how it should look a few minutes through, from then on you should have the hang of it and be able to get a nice long amount of rows with ease! Just keep going until you have your desired length. To see if it's long enough for you, just keep it on your fingers and wrap the tail around your neck, I like mine to go around about 7 times. Just do whatever you like!
5:Once you get it to your desired length, measure about 10 inches off your wrapping yarn and cut it. Take that yarn and weave down through the top of your first loop. Take that loop off of your finger then repeat with the next until they all have the string woven through them. Pull the string tight so your end gets a bit bunched up.

6: And finally, tie a knot or two as close to your scarf end as possible, then grab the beginning of your scarf and tie the two ends together, so you have one long loop. From here you can either wrap it around however you plea for ever, or wrap it around to where you like it once, and when it's where you like it you can add a button, or take a short piece of yarn and tie it somewhere to keep it in place!


And you're done! 
Now you can wear your lovely new creation! 
The more of these you make the easier it gets, I've made multiple ones in a day. You can also make yourself a bracelet or necklace, anything you can think of!
Hopefully this wasn't too confusing to read, but if you guys have any questions just leave a comment and I'll answer as soon as possible! 

Stay Minty,
- Juli